
Habt ihr auch einige Weihnachts- oder Neujahrskarten bekommen und auch die Umschläge dazu noch? Sehr gut. Dann schaut doch mal, ob eine CD/DVD in diese Umschläge passt. Denn dann könntet ihr ein paar CD-Hüllen basteln. Die kann man ja hin und wieder ganz gut gebrauchen und ihr habt außerdem weniger Papiermüll.
Hier erfahrt ihr in einer kurzen Fotoanleitung wie das ganze recht schnell zu machen ist. Die fertigen Hüllen könnt ihr auch in eure Notizbücher/Projektbücher o.ä. kleben - für den Fall, dass ihr ein paar Dateien immer dabei haben wollt.
Did you get some Christmas or New Year cards and do you still have the envelopes? Great! Then please have a look, if a CD / DVD fits into these envelopes. Because in this case you can craft a (few) CD cover(s).
Did you get some Christmas or New Year cards and do you still have the envelopes? Great! Then please have a look, if a CD / DVD fits into these envelopes. Because in this case you can craft a (few) CD cover(s).
Ihr benötigt: Briefumschläge, Schere/Cutter, Kleber, Bleistift, Lineal oder einfach die alten Weihnachtskarten.
Dauer: etwa 5 Minuten______________
Here you can find a brief photo guide on how to make them. The finished cover you can also stick in your notebooks / diaries, etc. - if you want to have a few electronic files there.
You will need: Envelopes, scissors / cutter, glue, pencil, ruler, or just the old Christmas cards.
Duration: 5 minutes

1. Schaut, ob eine CD in die Umschläge passt und lasst sie kurz im Umschlag.
Control if CDs/DVDs fit the envelope(s).
2. Macht eine Markierung am Rand (breiteste Stelle + 2 mm) der CD, Tipp: einfach gegens Licht halten! Dann kann die CD wieder aus dem Umschlag.
Mark the envelope where CD ends (widest point plus 2 mm). Tip: Hold the envelope to light.

3. Mit der alten Karte oder einem Lineal im rechten Winkel zur bleibenden Kante, eine Linie ziehen, welche die Breite der Hülle markiert. Die Linie seht ihr auf dem folgenden Foto.
With the old card or a ruler at a right angle to the remaining edge, draw a line marking the width of the envelope. You can see the line in the following picture.

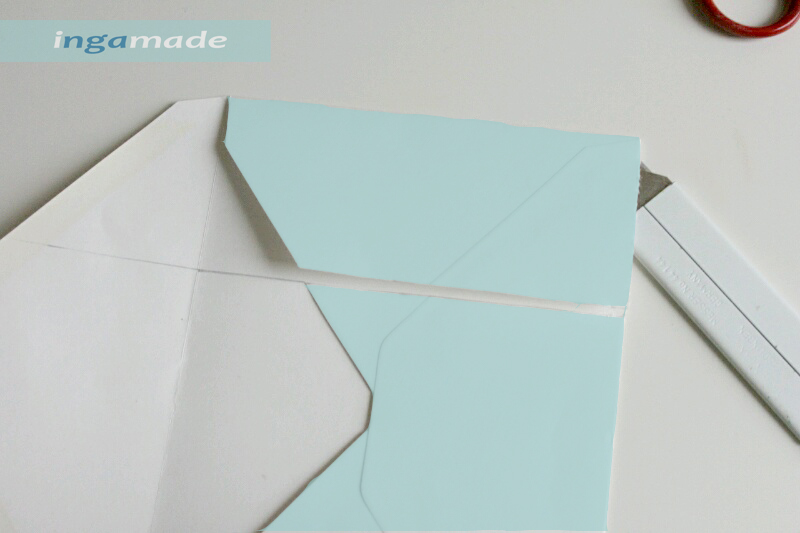
4. ACHTUNG: jetzt nur die obere Lage des Umschlags (auf dem Bild blau eingefärbt) einschneiden und dann die untere Falz des Abschnitts, der nicht mehr benötigt wird (der obere blaue Teil), auftrennen. Es sollte jetzt etwa so aussehen:
ATTENTION: Now cut the front layer of the envelope (colored blue) and the section that is no longer needed (uppe blue part in the picture), with a cutter-knife. It should now look like this:
5. Nun schneidet ihr die untere Lage etwa 1-2 cm neben der vorher eingezeichneten Linie (wichtig für das Zusammenkleben der Teile). Orientiert euch dafür an der schwarzen Linie 1.
Now you cut the bottom layer about 1-2 cm from the previously marked line (for gluing the parts). The black line 1 is for orientation.

6. Jetzt wird der Seitenteil gefaltet (pinke Linie 2) und ihr klebt den oberen Umschlagteil dort fest. Dann könnt ihr dort hinein das Label schneiden (graue Linie 3.
Now fold along the pink line 2 and glue the upper layer to this folded part. Then cut (gray line 3) the label.

7. Fast fertig: Ihr könnt das Ganze jetzt beschriften, CD rein und Hülle schließen.
Almost done: You can now label the whole thing, enclose a CD and then close the cover.

Ich hoffe, die Anleitung ist halbwegs verständlich. Viel Spaß beim Basteln!
I hope this tutorial is understandable. Have fun crafting!

Keine Kommentare:
Kommentar veröffentlichen